이번시간에는 오픈소스 메세지 브로커인 RabbitMQ를 로컬에 설치하고, Spring Boot 프로젝트를 이용해서 간단하게 메세지를 전송하고, Listening 하는 샘플 프로젝트를 만들어보도록 하겠습니다.!!
1. RabbitMQ의 구성요소
들어가기에 앞서 RabbitMQ는 메세지큐로 Advanced Message Queuing Protocol(AMQP)의 구현체라고 할 수 있습니다.
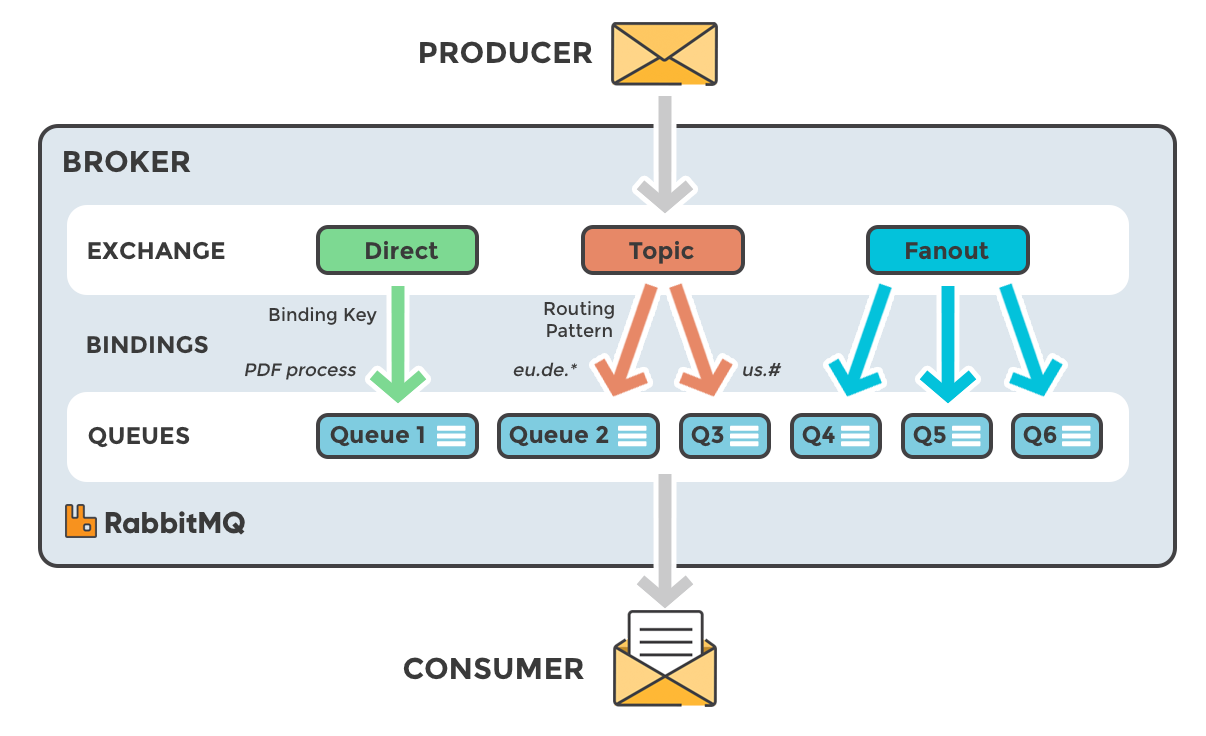 출처: https://www.cloudamqp.com/img/blog/exchanges-topic-fanout-direct.png
기본적인 메세지큐에 대해서는 다들 알고 있으니까, 간단한 내용은 생략하겠습니다. Producer가 메세지를 생산하고 Message Broker에게 메세지를 보내고, Consumer는 Broker를 Listening을 하면서 해당 메세지를 소비합니다. RabbitMQ에서는 Exchange라는 개념이 등장하는데, Producer가 어디에다가 보낼래?를 나타냅니다. Exchange 종류에 따라서 Direct, Topic, Fanout 이런 식으로 종류가 나누어지게 됩니다.
그림이 너무 좋아서, 설명을 계속 이어나가자면 Direct는 BindingKey를 통해서 특정 Queue에 직접 보냅니다. 그래서 Direct인거겠죠?
Topic은 주제를 뜻하게 때문에 Direct보다는 범위가 넓습니다. 당연히 Queue가 여러개 등장하고, 그렇다면 각각 Queue에 어떻게 할당할지? 🤔궁금증이 생깁니다. 여기서 등장하는게 Routing Key (Routing Pattern)으로 큐에 메세지를 쌓는 것을 매칭시킬 수 있습니다.
마지막으로 Fanout은 SpreadOut 처럼 흩뿌리기! 라고 생각하면 될것 같습니다. 더 자세한건 문서를 확인하고, 아래에서 Config 설정할때 추가로 다루도록 하겠습니다.
2. 설치하기
docker 로 설치하기
$ docker run -d --hostname localhost --name my-rabbitmq -p 5672:5672 -p 15672:15672 rabbitmq:3-management
2개의 포트 바인딩을 하는데 5672는 AMQP 포트이고, 15672는 웹관리 콘솔포트 이다.
- 웹관리 콘솔 url: localhost:15672
- default 로그인 접속정보: guest/guest
3. 의존성 추가
<dependency>
  <groupId>org.springframework.boot</groupId>
  <artifactId>spring-boot-starter-amqp</artifactId>
</dependency>
4. 환경설정
private static final String queueName = "message-queue";
private static final String topicExchangeName = "topic-message";

@Bean
public Queue queue() {
  return new Queue(queueName, false);
}

@Bean
public TopicExchange exchange() {
  return new TopicExchange(topicExchangeName);
}

@Bean
public Binding binding(Queue queue, TopicExchange exchange) {
  return BindingBuilder.bind(queue).to(exchange).with("foo.bar.#");
}
- Queue: 메세지를 담을 큐를 설정
- Exchange: 메세지 Producer가 보내는 곳
- Binding: 예제에서는 BindingBuilder를 사용해서 위에서 설정한
Queue와Exchange를 바인딩 시킨다. with로 들어가는 값은RoutingKey로 foo.bar.하위의 모든 키들과 관계를 맺는다.
@Bean
RabbitTemplate rabbitTemplate(ConnectionFactory connectionFactory) {
  RabbitTemplate rabbitTemplate = new RabbitTemplate(connectionFactory);
  rabbitTemplate.setMessageConverter(messageConverter());
  return rabbitTemplate;
}

@Bean
MessageConverter messageConverter() {
  return new Jackson2JsonMessageConverter();
}
Jackson 메세지 컨버터를 빈으로 등록하고, RabbitTemplate도 빈으로 등록한다. Spring boot가 ConnectionFactory를 주입해서 넣어준다.
5. 메세지 POJO
메세지를 주고 받을 수 있는 CustomMessage pojo를 만든다.
@Data
public class CustomMessage {
    private String text;
}
6. 메세지 보내기
Spring에서 ApplicationRunner 인터페이스를 구현하면 프로젝트가 실행이될때 동작하는 run메서드에서 간단한 메세지를 보내 보겠습니다.
private static final String topicExchange = "topic-message";
private static String routingKey = "foo.bar.baz";

@Autowired
private RabbitTemplate rabbitTemplate;

@Override
public void run(ApplicationArguments args) throws Exception {
  log.info("send message.....");
  IntStream.range(0,10)
    .forEach(i-> {
      CustomMessage message = new CustomMessage();
      message.setText("hello message : " + i);
      log.info("send message :{}", message);
      rabbitTemplate.convertAndSend(topicExchange, routingKey, message);
	});
}
rabbitTemplate으로 message 객체를 json으로 변환해서 메세지를 보냅니다.
7. 메세지 받기
@RabbitListener(queues = "message-queue")
public void receiveMessage(Message message) {
  log.info("receive message :{}", message);
}
Listener는 비교적 간단하게 앞에서 보냈던 @RabbitListner 어노테이션의 queues 속성을 설정하면 해당 큐에 적재된 메세지를 읽어들일 수 있습니다.

8. 마치며
이번시간에는 아주 간단한 RabbitMQ를 설치하고, SpringBoot 프로젝트랑 연동하는 방법을 알아봤습니다.기본적인 TopicExchnage 외에도 다른 Exchange를 구성하는 방법, Batch로 메세지를 전송하고 Listen하는 방법, 큐 네이밍전략, 클러스터 구성, fail-over 등등.. 많은 것들을 시도해 볼수 있는 프로젝트라고 생각됩니다.
📚 Related Posts
- Spring WebFlux 테스트 방법
- Spring과 MongoDB 연동 실전 가이드
- SpringBoot, MongoDB 시작하기
- Spring Boot 서버 타임존 설정 방법
- SpringBoot CommandLineRunner, ApplicationRunner 초기화 방법
- Jackson, LocalDateTime Serialization, Deserialization 이슈
- Spring Boot, Dockerfile로 이미지 생성, 배포하기
- SpringBoot RabbitMQ 연동하기
- Junit5 정리
- Spring Sentry(에러 트래킹 서비스) 적용하기
- [Spring] 빈 주입하는 방법 && Best Practice
- Thymeleaf 실무에서 자주 사용하는 것들
- Thymeleaf Collection 정보 화면에 렌더링하기
- Spring, JPA를 이용한 REST API 만들기
- [Spring] MultipartFile을 이용한 파일 업로드
- [Spring] 모델 검증(validation)
- [Spring]HandlerMethodArgumentResolver 인터페이스
- [Spring] DispatcherServlet에 대해서 알아보자
- [Spring] MVC 만들어 보기
- [Spring] 메세지 컨버터
- [Spring] MVC 살펴보기
- [Spring] @ConfigurationProperties를 이용해서 properties값들을 클래스로 관리하기
- [Spring] Profile 설정하기
- [Spring] SpringApplication를 통한 코딩
- [Spring Boot] 스프링 부트 3가지 특징
- [Spring] @SpringBootAppllication 어노테이션에 대한 고찰
- [Spring] bean circular dependencies (빈 순환 참조)
- [Spring]Bean에 대해서 알아보자
- SpringBoot, JPA, H2를 이용한 간단한API 작성
- [Spring] Spring Data Common 프로젝트 살펴보기
